Scroll tracking gives you an important metric for understanding how far down the page users are scrolling, and can provide you valuable insights into which content is engaging and which is not.
In this article, we'll explore how to activate scroll tracking on GA4 and set it up using Google Tag Manager (GTM).
How to Enable And Disable Scroll Tracking on GA4?
Here are the three steps to activate/deactivate scroll tracking in GA4:
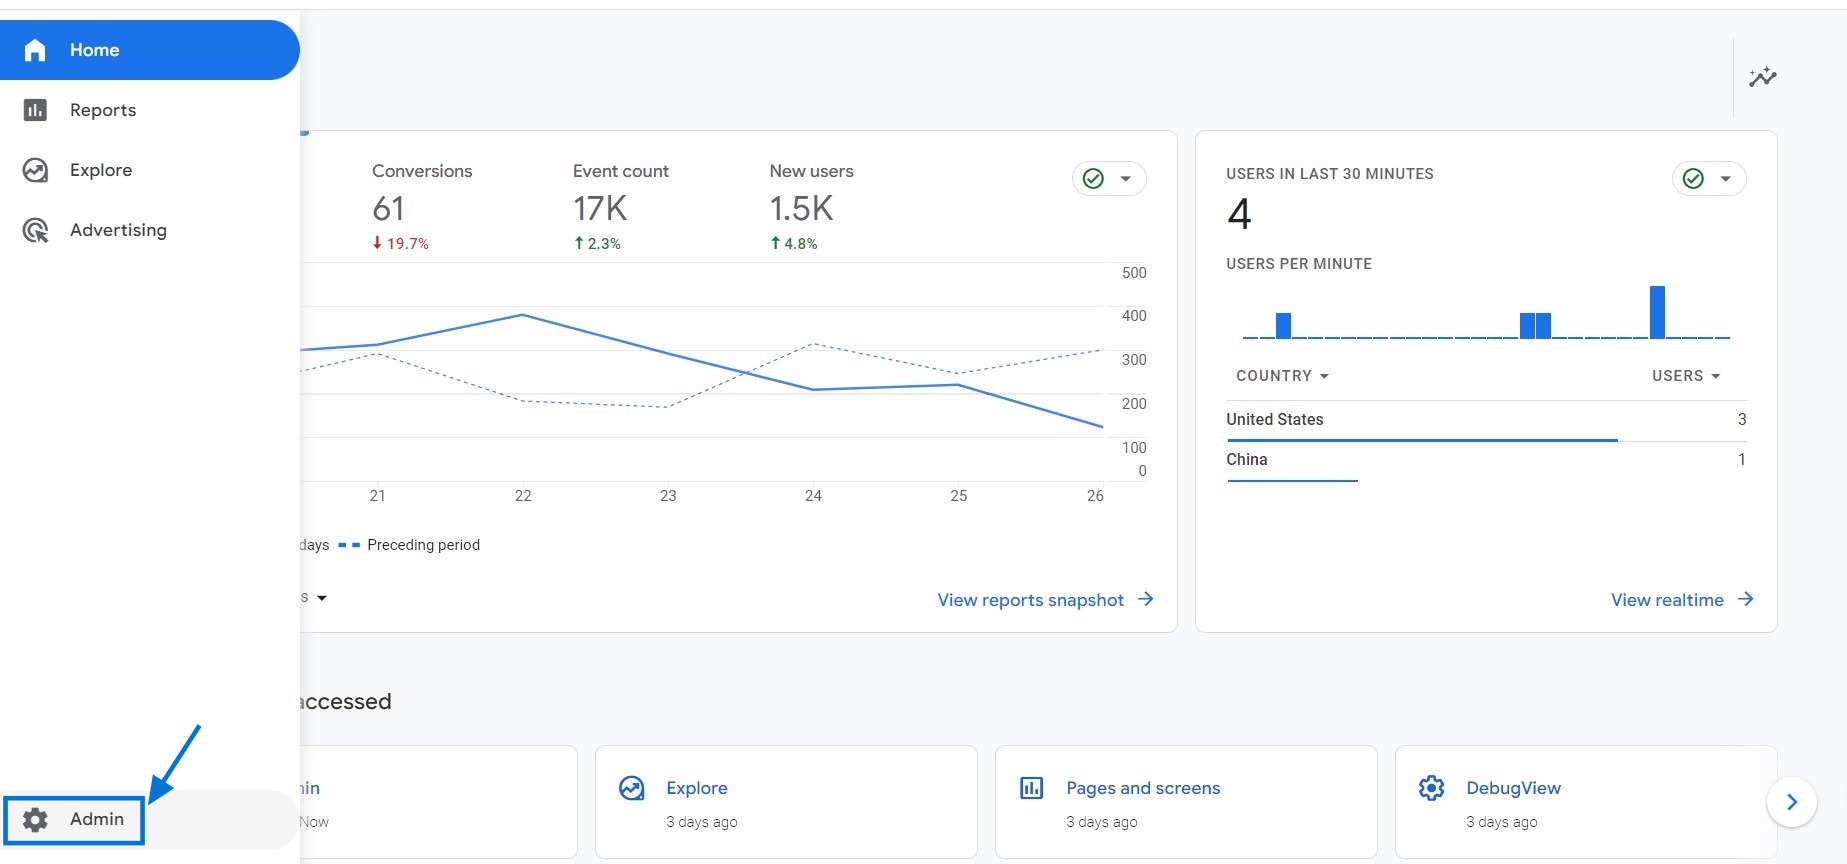
Once you're logged in, navigate to the "Admin" section of your account.
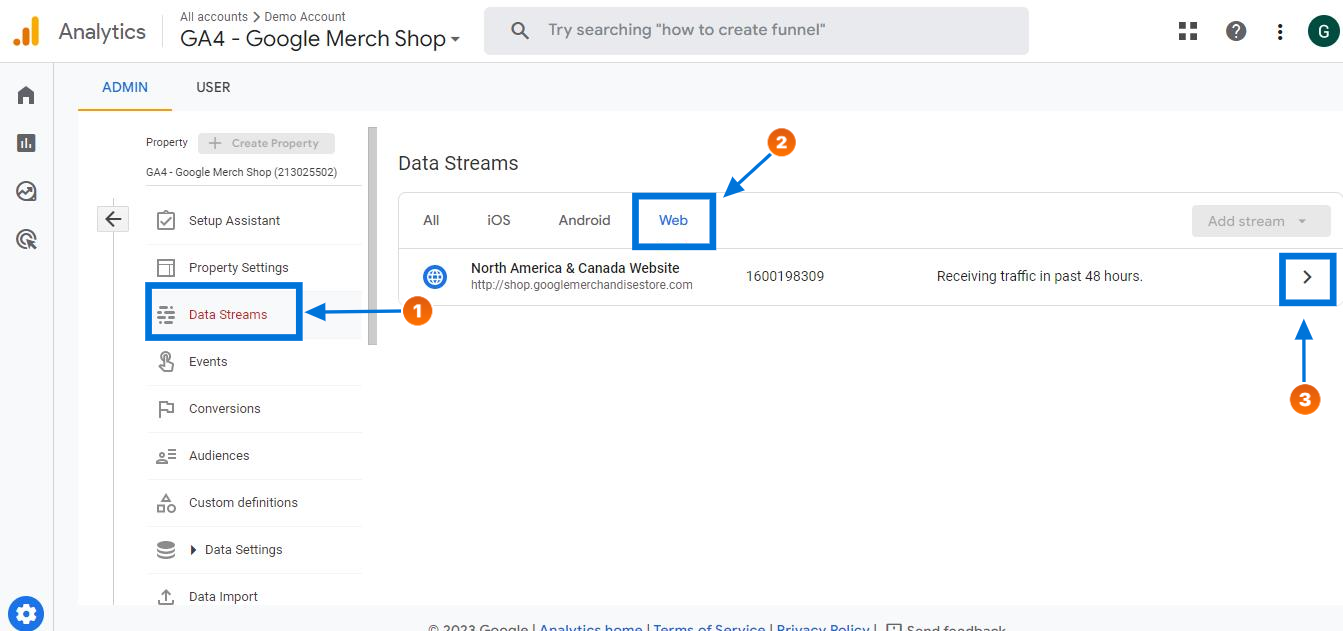
Select the "Data Streams" option in the left-hand menu and click on Web Data Stream.
Under "Enhanced Measurement," click on the gear icon, and you will see the option to switch Scroll event tracking on or off.
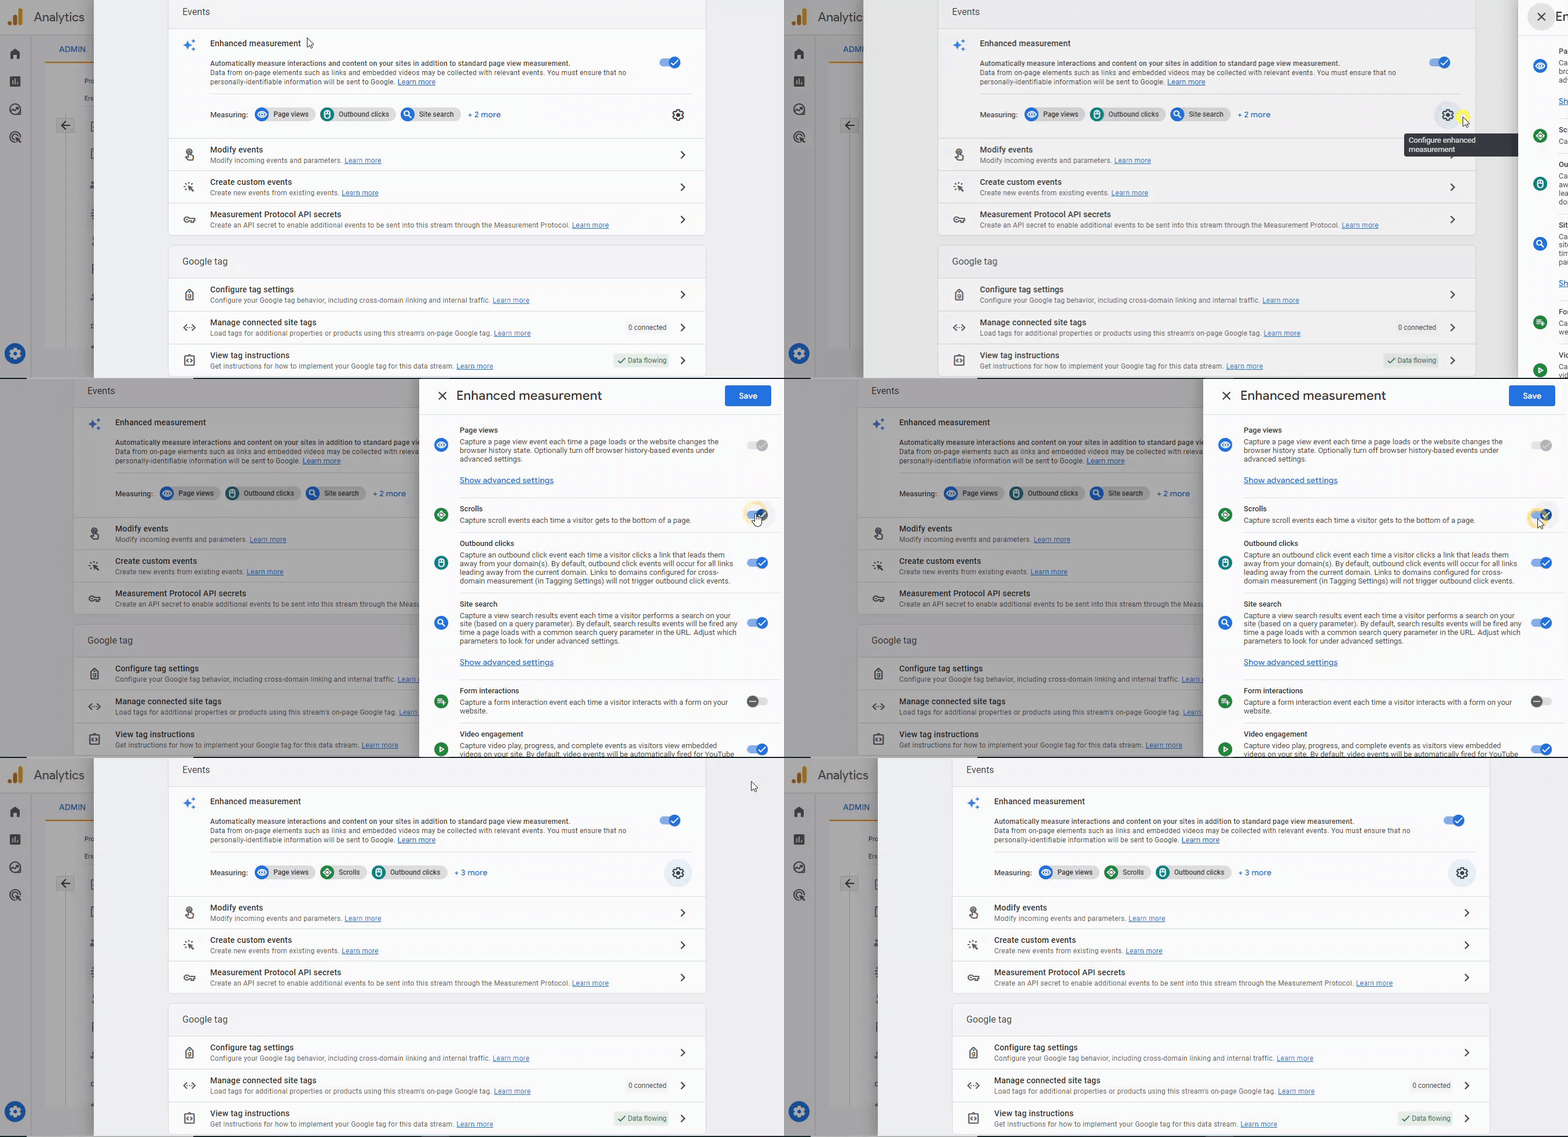
With these steps, you'll be able to activate scroll tracking for your GA4 account and start gathering valuable insights about how users interact with your website.
To find scroll events in Google Analytics 4, you can navigate to the Events section in the left-hand menu.
However, it's important to note that scroll tracking is only triggered when users scroll 90% of the page.
This means that you won't be able to track users who only scroll to the middle of the page or less.
By using Google Tag Manager (GTM), you can set up scroll tracking to capture more data.
How to Set Up Scroll Tracking with GTM?
If GA4 is not installed on your site through Google Tag Manager, you will need to set it up first. You can refer to our How to Set Up Google Analytics 4 Using Google Tag Manager article for guidance.
Before setting up scroll tracking in Google Tag Manager, it is necessary to disable the default scroll tracking setting in GA4. For step-by-step instructions on how to do this, you can refer to the previous section.
Now, let's walk through the steps to set up scroll tracking on GTM.
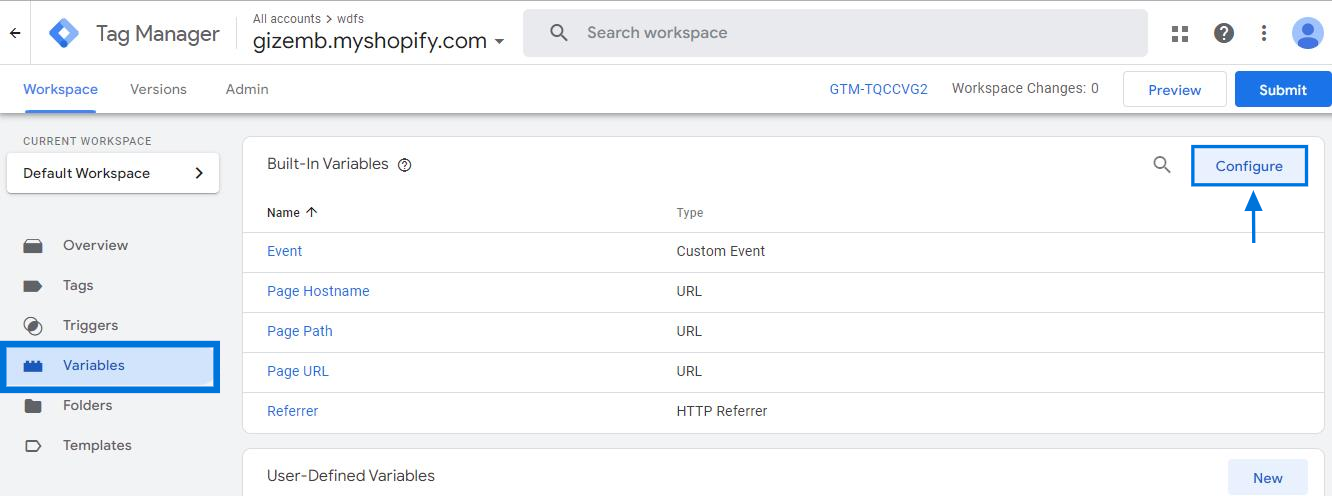
Open your Google Tag Manager (GTM) account and on the left-hand side of your workspace, click on the "Variables" option. Then, select the "Configure" button located at the top of the screen.
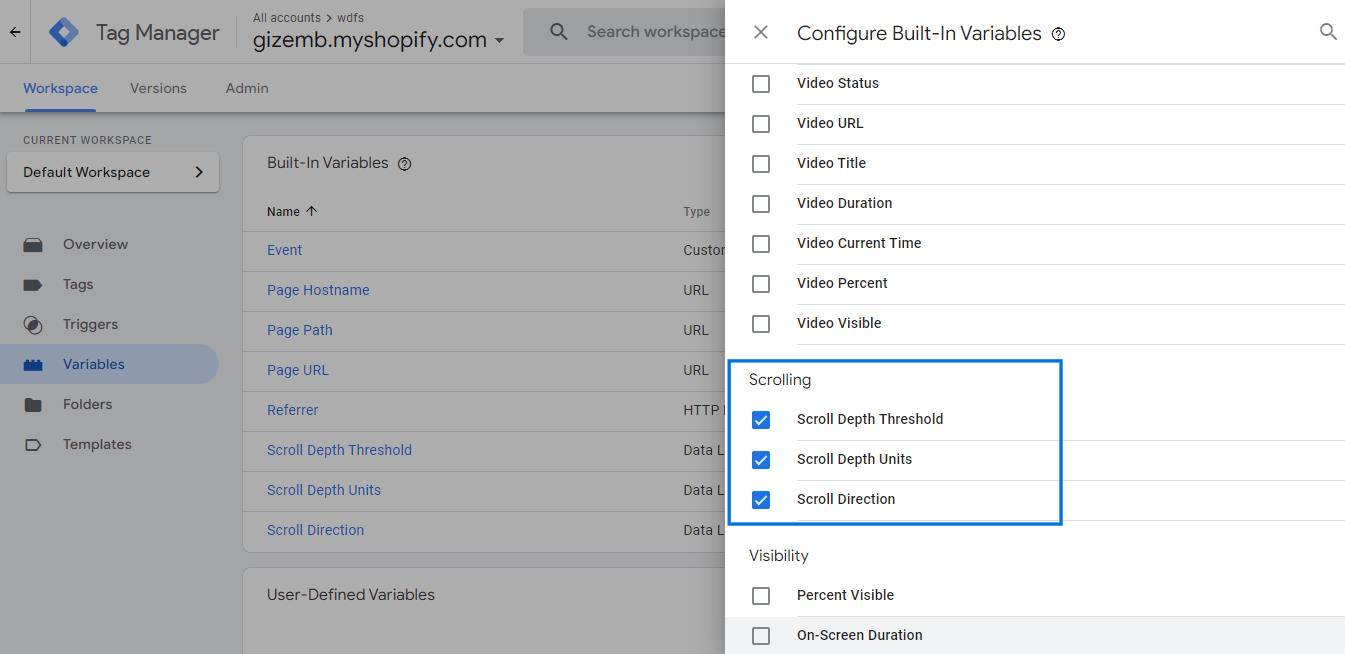
Scroll down to the "Built-In Variables" section and find the "Scrolling" option.
Click on "Scroll Depth Threshold", "Scroll Depth Units" and "Scroll Direction".
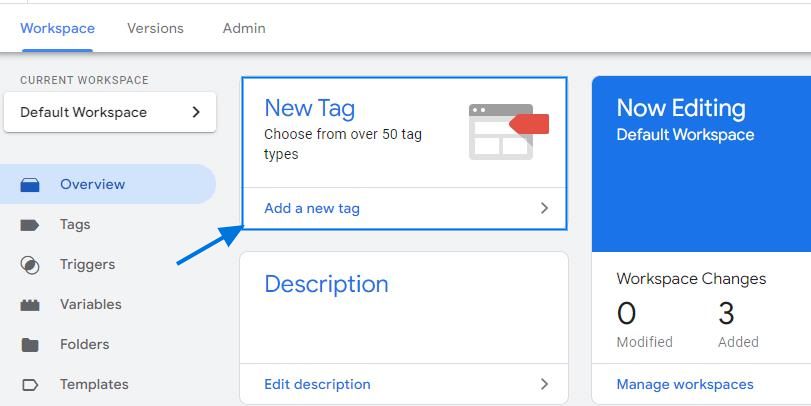
Go back to your Google Tag Manager workspace and click on "New Tag."
Give your tag a descriptive name in the "Tag name" field. Next, click on "Tag Configuration and select "Google Analytics: GA4 event."
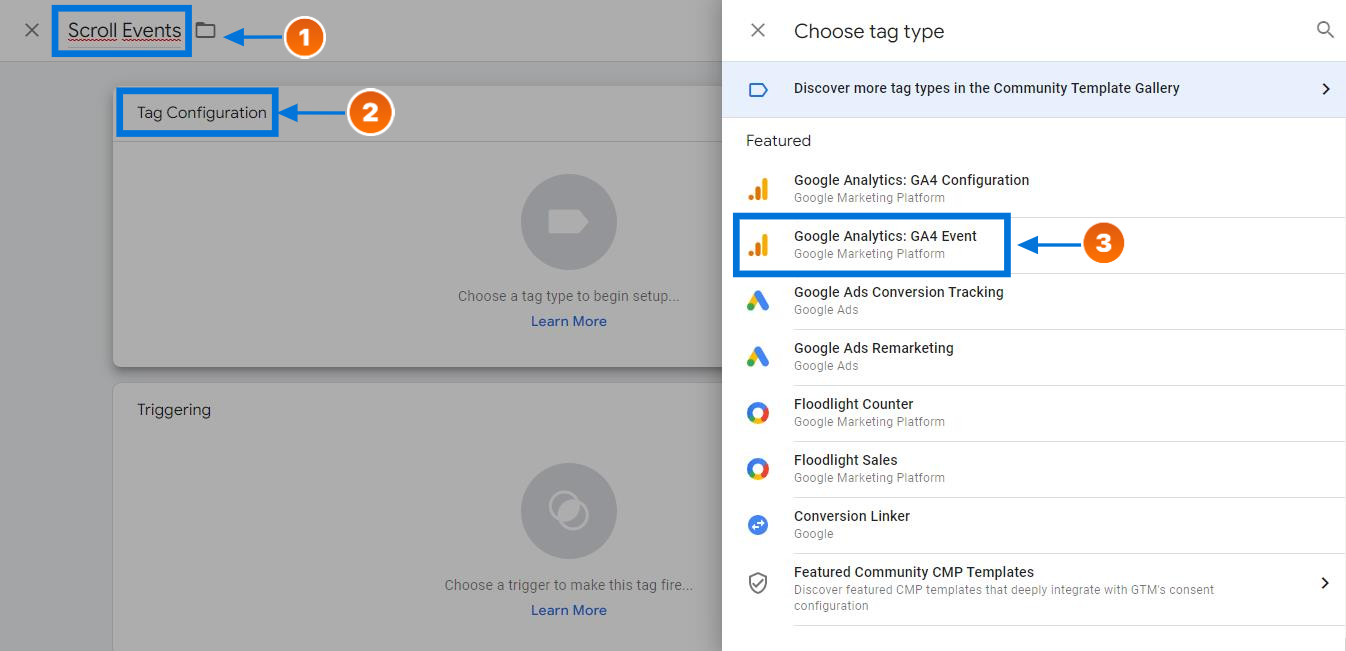
Select "None - manually set ID" from the "Google Analytics: GA4 event" drop-down menu. Then, paste your GA4 Measurement ID in the "Measurement ID" field.
To find your Measurement ID, log in to GA4 > navigate to Admin > Data Stream > Click Web > Copy Measurement ID.

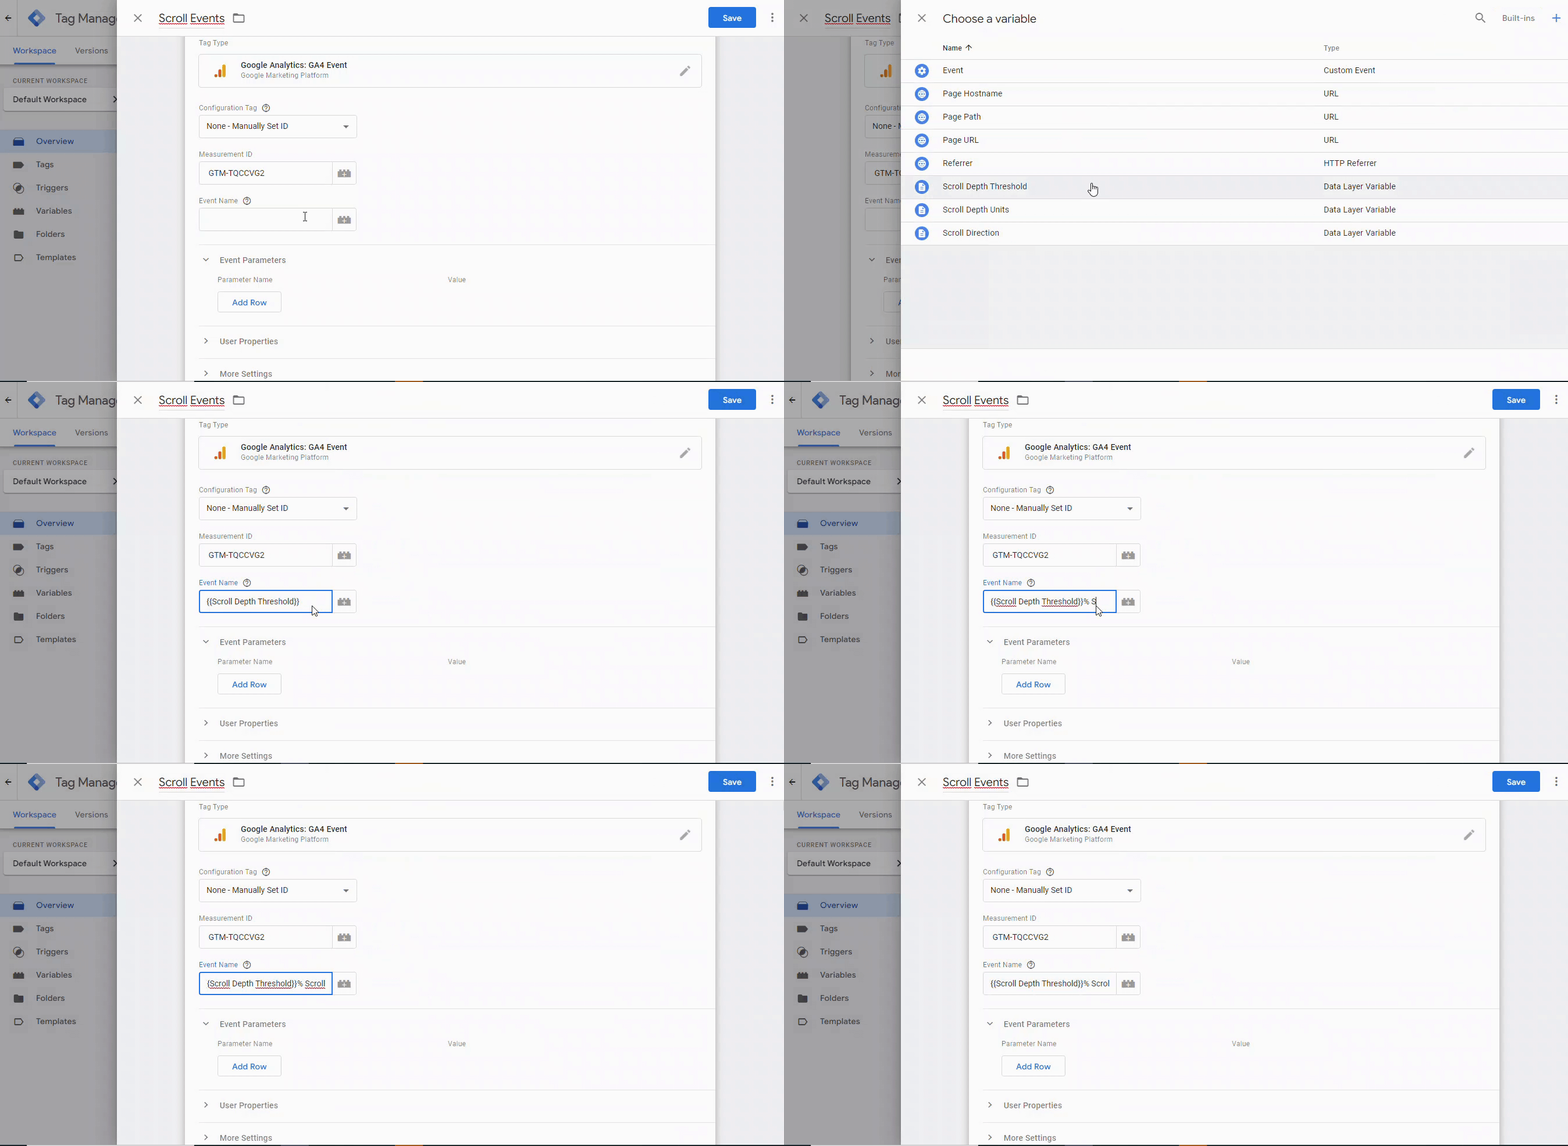
Here, you need to specify the name of the event. You can choose;
- Scroll Depth Threshold: This measures how far visitors scroll down the page.
- Scroll Depth Units: This measures scroll depth in pixels or as a percentage of the page height.
- Scroll Direction: This measures whether visitors are scrolling vertically or horizontally.
In our case, to track scroll events at specific percentages(e.g. 10%, 25%, 50%, 75%, etc.), we can add the "Scroll Depth Threshold" variable.
To make the event name more descriptive, you can add a % sign after selecting the variable and add the word "Scroll" after it. This will show the event name in your GA4 reports as "50% Scroll," for example.
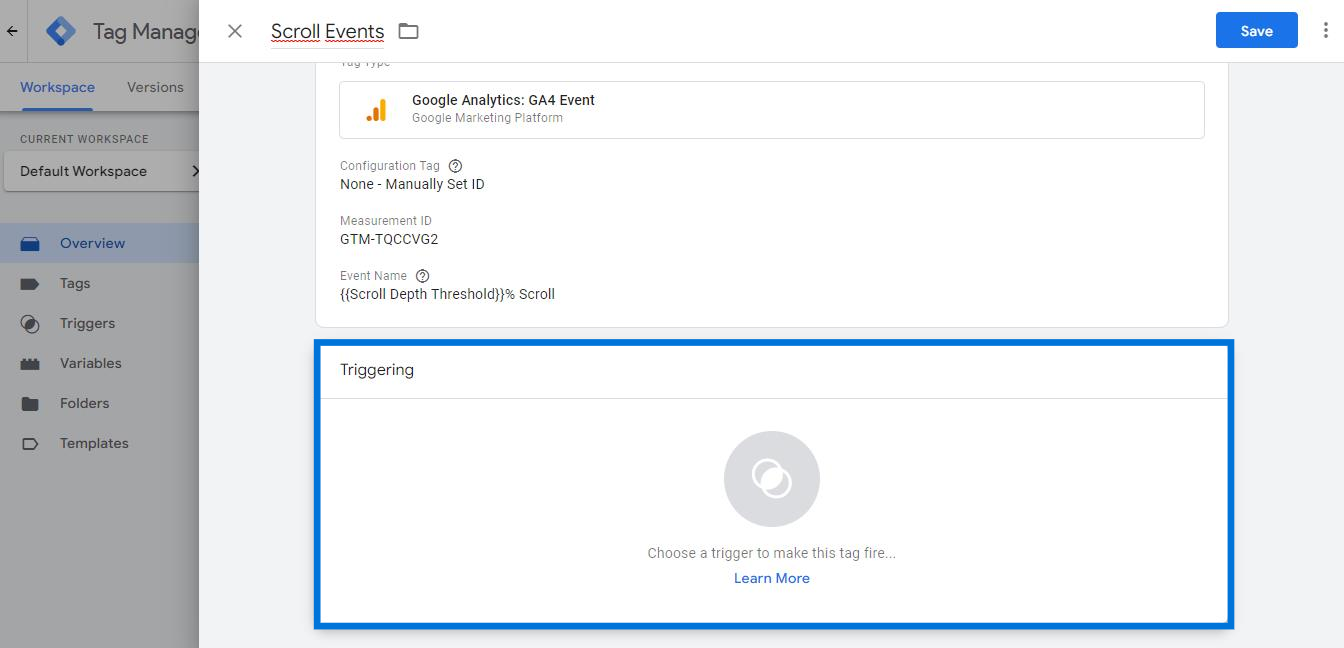
Click on the "Triggering" section.
Now click on the "+" icon at the top right of the page to add a new trigger.

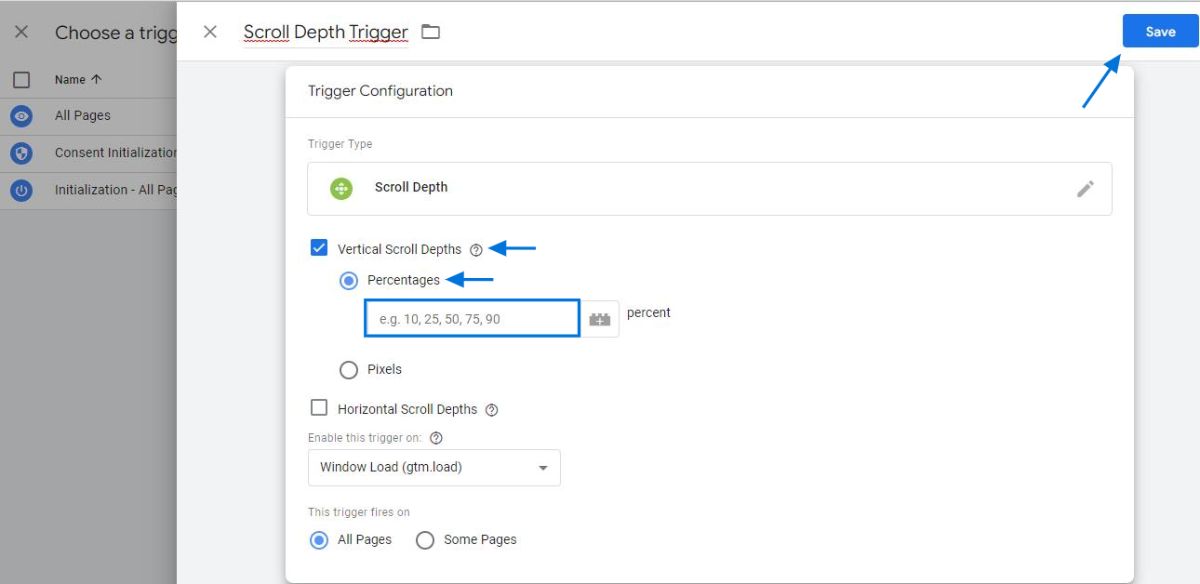
Give your trigger a descriptive name in the "Trigger name" field. Next, click on "Trigger Configuration" and select "Scroll Depth."
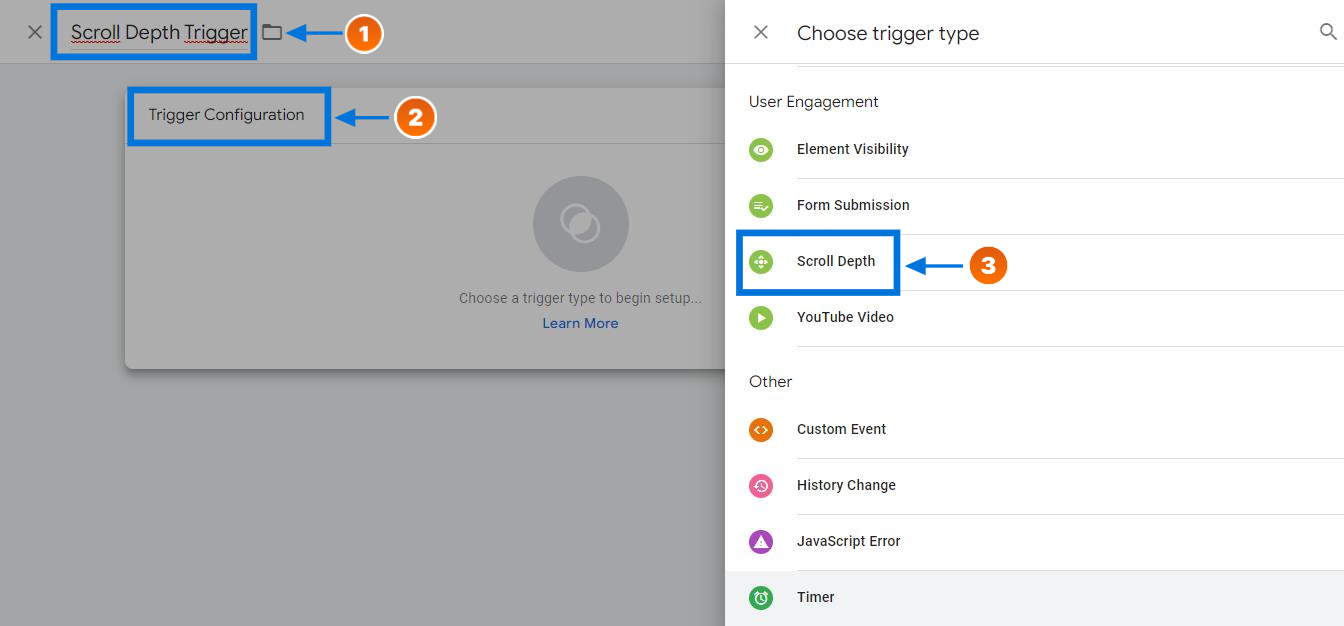
At this step, you can choose to track the scroll depth in either pixels or select a scroll direction (vertical or horizontal).
In our case, select "Vertical Scroll Depths" and add your desired threshold limits separated by commas.Then, save the changes.
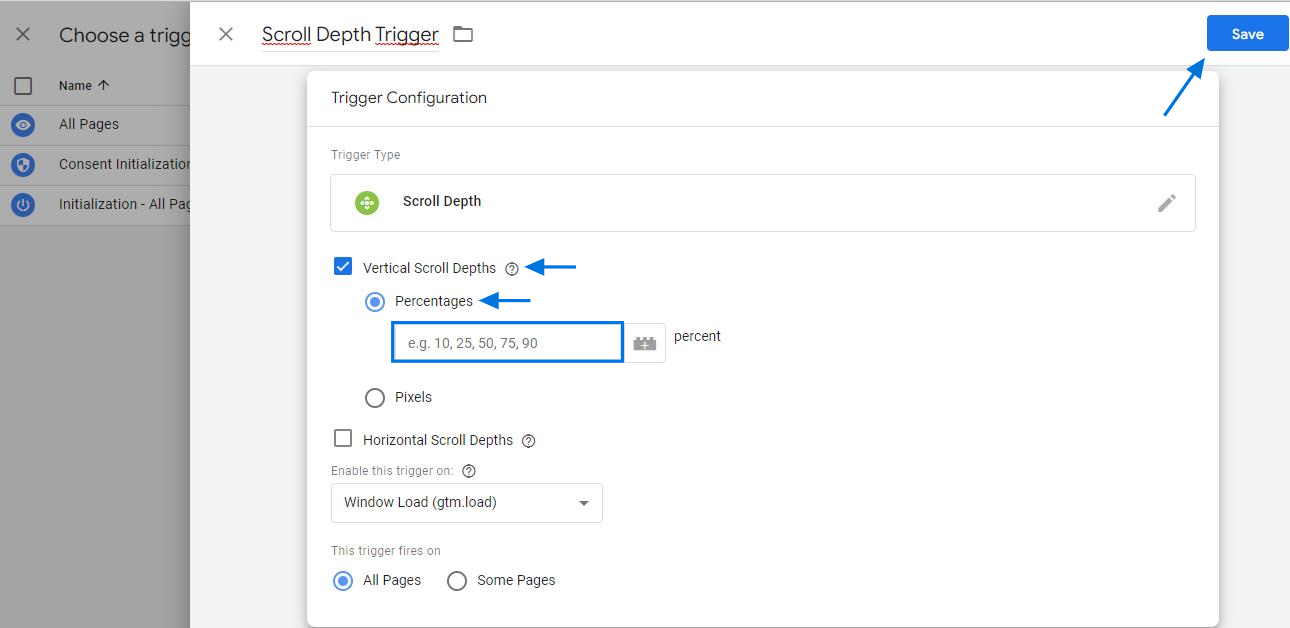
After configuring your trigger, click on the "Save" button to save your changes. Then, a safer approach is to test the setup in GTM debug mode before clicking the "Submit" button to publish your changes to your Google Tag Manager container.
Once you've set up your GTM scroll tracking events and published the changes, you'll need to wait for the data to appear in your GA4 account. This may take up to 24 hours, so be patient.
